Processing.js
We explore the Processing.js library, its use in Khan Academy, and my personal creations in Processing.js.
Background
Processing.js/ProcessingJS is a JavaScript library developed in 2008 meant to make the Processing programming language accessible to the web by transpiling any code in Processing.js to JavaScript. Processing is a free, open-source software built on top of Java and first developed in 2001 that allows developers to create interactive visualizations and animations using a simplified syntax and drawing API. The visual outputs are easy to generate and quite reactive, serving very well to gain practice in design, gaming, and art.
Despite Processing.js being a very simple way to write Processing for the web, this library is actually no longer actively maintained nor recommended; it has been superseded by the p5.js library which came out in 2013. Both are interpretations of Processing to the web, but p5.js has departed from trying to mimic original Processing syntax in order to better match JavaScript syntax. I chose to write only about Processing.js in this blog post in order to highlight the library through which I and many other young programmers originally learned to code. Many of the principles encountered whilst programming in Processing.js are perfectly translatable to the p5.js library up to some syntax modifications. It's for this reason that I wrote the remainder of this post with beginner/intermediate programmers in mind; but I think even advanced programmers can get something out of this, if not just inspiration.
For clarity, we are not discussing Processing 3+, the version of Processing released as early as 2015 meant to respond to browsers having removed the ability to run applets and which introduced new features like surface and settings(). Processing.js doesn't support anything new to Processing 3.
If one were to compare Processing.js to other similar options in its time, several key properties would have stood out:
- Natively offers an HTML5 canvas element on which a user can draw pixel-based graphics (alternatively, one may use Scalable Vector Graphics (SVGs) for rendering).
- Easy cross-platform & cross-browser capabilities as based on JavaScript.
- Offers a simplified syntax and intuitive API.
- Non-optimized performance, so not the best suited option for data visualization nor game development.
- Limited 3D support (as compared to, say, Three.js), as primarily focuses on 2D graphics.
Khan Academy
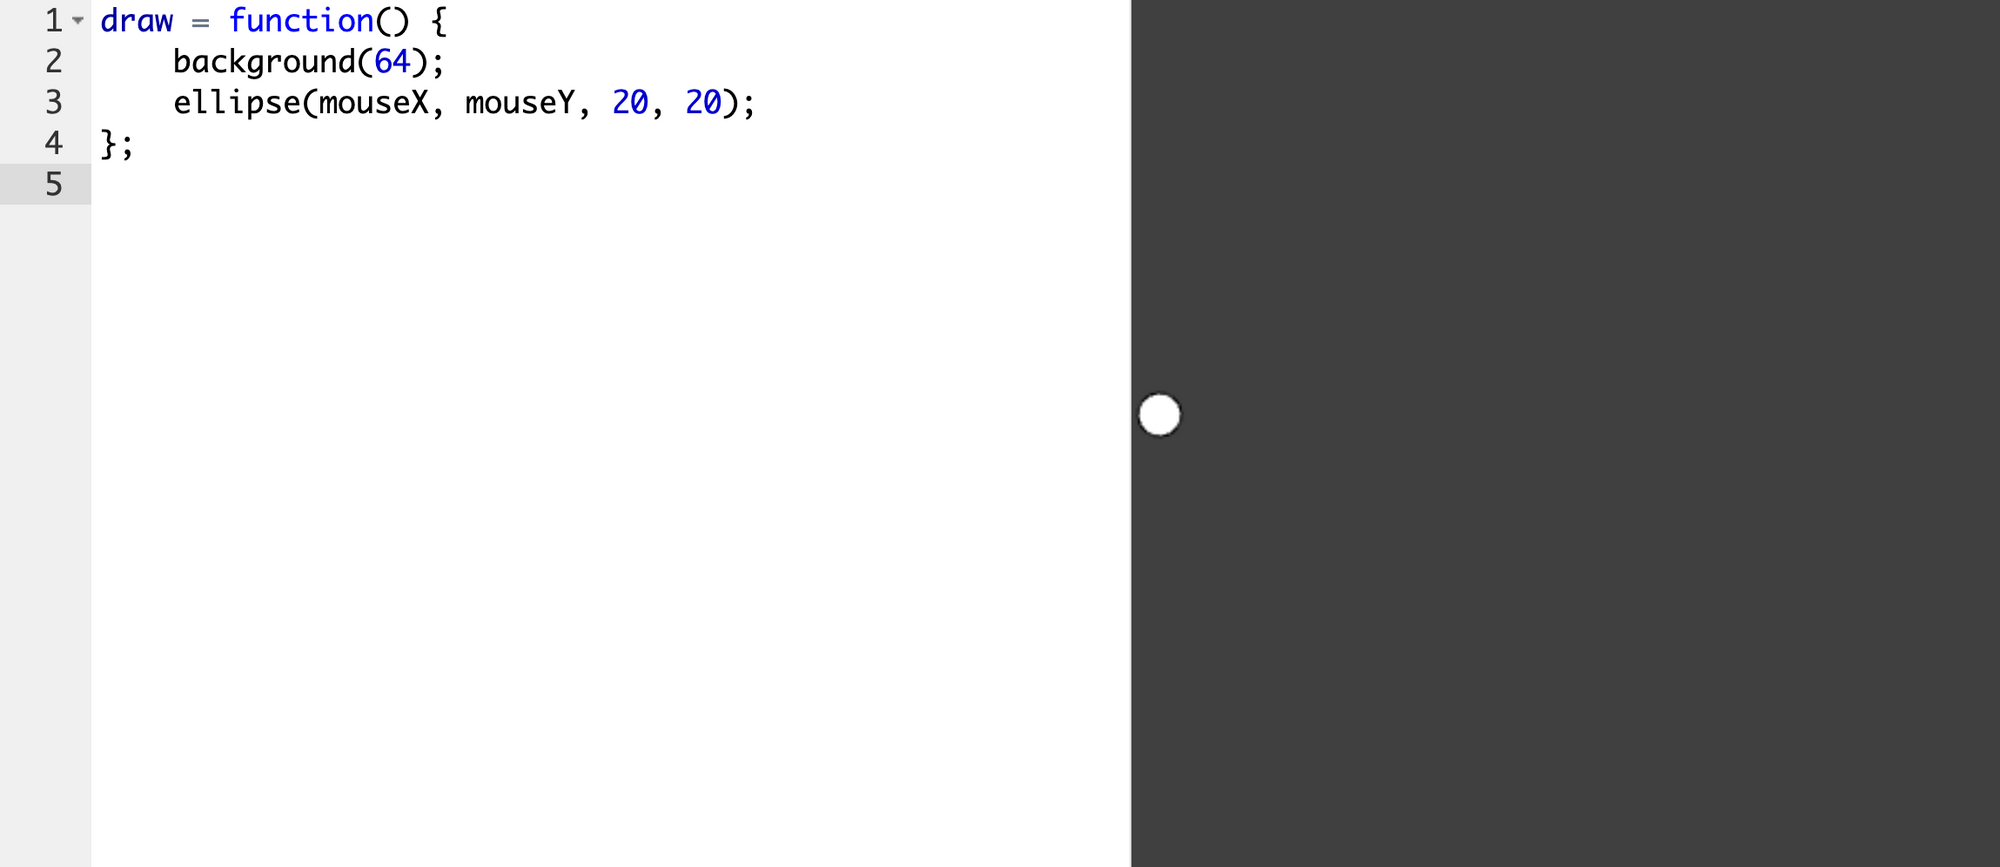
KhanAcademy.org offers an environment to write in a language based on the Processing.js library with ah HTML5 canvas immediately visible to the side of the editor in order to visualize what is being drawn. Changes are instantaneous between the editor and the canvas, so developing through this site is a pleasant experience. Typically Processing.js is embedded within an HTML file as follows:
<!DOCTYPE html>
<html>
	<head>
		<title>Example Processing.js Embedding</title>
		<script src="https://cdnjs.cloudflare.com/ajax/libs/processing.js/1.6.0/processing.min.js"></script>
	</head>
	<body>
		<script type="application/processing">
			void setup(){
				size(200, 200);
			}
			void draw(){
				background(64);
				ellipse(mouseX, mouseY, 20, 20);
			}
		</script>
		<canvas id="sketch"></canvas>
	</body>
</html>
The resulting render would contain a canvas element which is interactive.
The key to the interactivity here is the use of mouseX and mouseY, which are quite easy ways to access the current coordinates of the user's mouse on the canvas.
In contrast, Khan Academy removes much of the overhead to begin writing in Processing.js. There is no setup required to make the canvas, only instructions for what to draw. Moreover, KA follows a slightly different formatting rule: there is no need nor way to specify output type for a function, so void draw() { ... }. Instead, we must use the alternative function constructor draw = function() { }.
Unfortunately, the platform does not offer a great deal of wiggle-room to withstand heavy computations, so it limits just how demanding of methods may be run. Some other small differences include:
- KA assuming angles to be expressed in degrees, not radians,
- KA offering a custom image/sticker library accessed via the
imageandgetImagecommands, - KA offering a Gaussian random generator through the
Randomclass, - The keyword
mousePressedin Processing.js is writtenmouseIsPressedon KA, - Transformations like
translateandrotatecan appear anywhere in a KA script; but Processing.js usually acts on them only in adrawloop, - KA offers a
Programobject which contains some of the metadata/methods that can refer to the whole program, such as with its methodProgram.resetto simply start the program from zero; it's not native to Processing.js.
KhanAcademy's Processing.js environment is the platform through which I initially learned to code, and I've created dozens of programs since. I will proceed in this blog post by highlighting some of these programs and identifying elements of Processing.js that made these programs possible.
My First Program: Draw Loop
The following script and accompanying output represent my first program on Khan Academy (and ever!). The code attempts to illustrate an oscillating car.
var x = 200;
var speed = 5;
var draw = function() {
    noStroke();
    background (252, 255, 214);
    fill (0, 0, 0);
    rect (350, 160, 50, 100);
    fill (0, 0, 0);
    rect (50, 160, 50, 100);
    fill (255, 0, 0);
    rect (x, 200, 100, 20);
    rect(x + 15, 178, 70, 40);
    fill (77, 66, 66);
    ellipse (x+25, 221, 24, 24);
    ellipse (x+75, 221, 24, 24);
    x = x + speed;
    if (x> 250) {
        speed = -5;
    }
    if (x < 100) {
        speed = 5;
    }
};
My first Processing.js program through Khan Academy
My first every program!
Leaving behind how poorly written the code may be deemed, the code exemplifies a straightforward use of the draw method offered by Processing.js: we simply state which colors to be used for fills or outlines (a.k.a. strokes), which geometric objects to be displayed, and however certain variables should change over time. In particular, the draw method is special as it is repeatedly called by the page according to a fixed frame rate, constantly redrawing its contents. Drawing is also possible outside of the draw loop, but if your canvas should update over time, most drawing commands will belong in the draw loop.
For the the remainder of the article, I'll present most of my programs in GIF form, because running all of the corresponding canvases would break all of our browsers :)
Games
Curve Ball: Perspective and Computer Opponent
Now I present my remake of a classic online game called Curve Ball. I call it Curve Ball 2.0. The originaly version allows a user to compete against a computer player in a game of 3D pong. The catch is that either player may apply spin to the ball in a similar fashion to ping-pong. My version allows for any number of balls to be served, calculating the physics of each separately.
One custom method featured in this game is to resize objects based on their relative distance from the camera, an effect called perspective or foreshortening. The following method takes applies a perspective change according to the object's depth in the scene.
// hyperparameter to determine the strength of perspective
var persp = 200;
// apply perspective to something of size `size`
var perspective_calc = function(size, depth){
    return (size * persp) / (depth + persp);
};
Method to shrink objects based on depth
Moreover, the spin is accomplished by keeping track of paddle speeds and setting the ball's lateral acceleration proportional to that speed once rebounded off either player's paddle. The opponent is controlled by having it hunt for the closest ball's current lateral position but having only a fixed speed at which it can traverse its lateral space to chase that ball.
Tom the Koala's Surfing Adventure: Math and Character Design
The next game I'd like to present is Tom the Koala's Surfing Adventure.
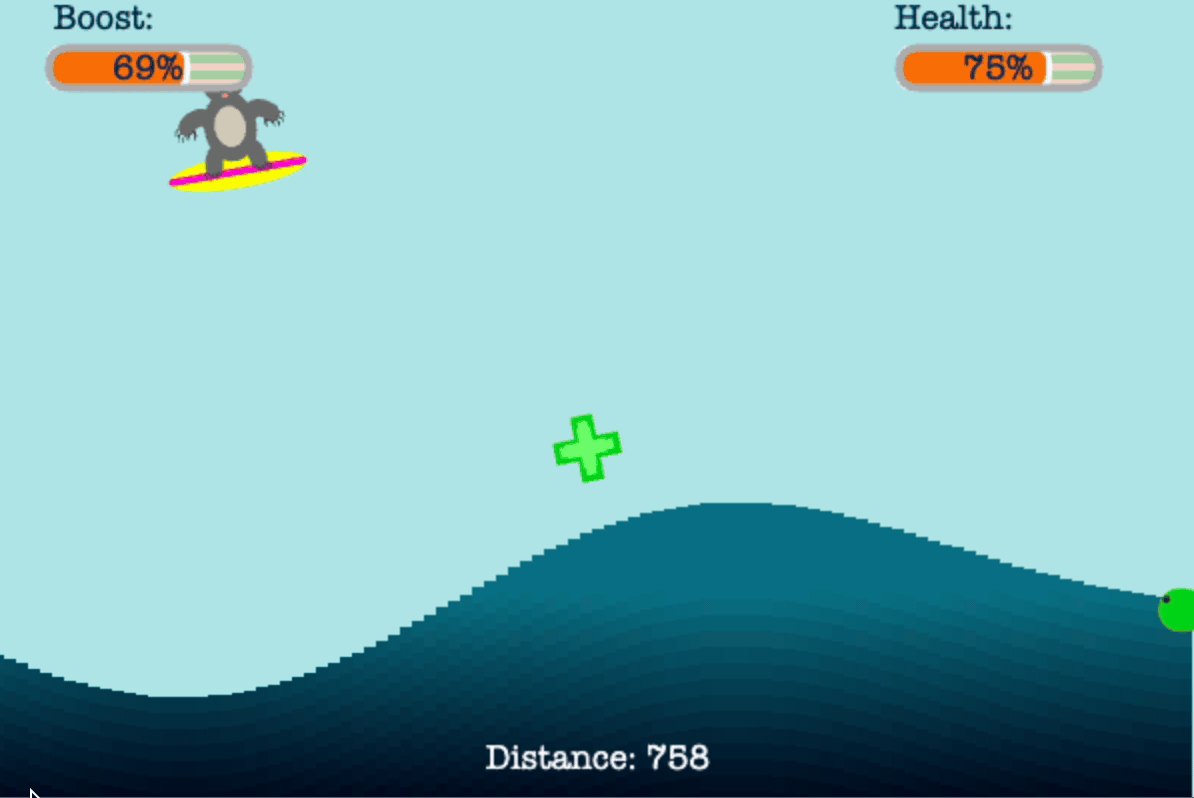
The point of this game is for the player to help Tom the Koala to surf past all of the unhealthy items in red and pursue healthy items in green using his limited vertical boost.
One key feature to this game is having a virtually non-repeating landscape. It was a primary goal of mine to make sure the wave on which Tom surfs to never appear to repeat. Using the OOP nature of Processing.js, I proceeded in two steps:
First, define a custom Sin class which can store the parameters of a sine function like its amplitude, period, and phase, as well as an individual function to evaluate that function at any argument, plus get its derivative at any argument as well.
// Sin class
Sin = function(z) {
    this.amp = z.amp || 1;
    this.per = z.per || width;
    this.phase = z.phase || 0;
    this.angFreq = Math.TAU / this.per;
    this.get = function(arg) {
        return this.amp * Math.sin(this.angFreq * arg - this.phase);
    };
    this.getDeriv = function(arg) {
        return this.amp * this.angFreq * Math.cos(this.angFreq * arg - this.phase);
    };
},
Sin class: a simple sine wave
You'll notice the use of the logical or ||, which behaves as follows in Processing.js:
A || B evaluates to A if A is not false, and B otherwise. Effectively, if the argument z already has a non-None value at z['amp'], then this.amp will take on the value z.amp; otherwise, this.amp is set to a default value 1.
Second, define a custom Wave object which will represent a sum of many Sin functions.
// Wave object
Wave = {
    list: [],
    N: 15,
    Amp: {
        start: height / 3,
        stop: height / 2.2,
        next: function() {
            return map(random(), 0, 1, this.start, this.stop);
        },
    },
    Per: {
        avg: width,
        std: width * 67 / 400,
        next: function() {
            return Math.abs(randomGaussian() * this.std + this.avg);
        },
    },
    Phase: {
        start: 0,
        stop: Math.TAU,
        next: function() {
            return map(random(), 0, 1, this.start, this.stop);
        },
    },
    const: function() {
        for(var n = 0; n < this.N; n ++){
            this.list.push(new Sin(
                { amp: this.Amp.next() / this.N,
                  per: this.Per.next(),
                  phase: this.Phase.next()
                }));
        }
    },
    get: function(arg) {
        var sum = 0;
        for(var w in this.list) {
            sum += this.list[w].get(arg);
        }   return sum;
    },
    getDeriv: function(arg) {
        var sum = 0;
        for(var w in this.list) {
            sum += this.list[w].getDeriv(arg);
        }   return sum;
    }
},
Wave class: a sum of Sin waves
Mathematically, a Wave will necessarily be periodic, but that periodicity will be made so large as N increases, meaning the player will not notice the periodicity.
I also feel that the system for displaying objects throughout the game is sensible in its approach. Each draw iteration will loop through all visible items (the red or green objects) and call their display method. The prototype display method is shown below.
// Display an Item instance
Item.prototype.display = function() {
    // set local environment for transformations
    pushMatrix();
    	// center us at position of the object
        translate(this.pos.x, this.pos.y);
        // rotate object to be parallel to gradient of Wave
        rotate(atan(Wave.getDeriv(this.outputX)) / 2);
    	// the display instructions depend on which type of object this is
        switch(this.image.substring(2)){
            // in the case our object is a Shark
            case "Shark":
                fill(Theme.Item.SharkFill);
                stroke(Theme.Item.SharkStroke);
                strokeWeight(2);
                beginShape();
                    vertex(-20, 20);
                    bezierVertex(-9, -4, -12, -11, 10, -16);
                    bezierVertex(21, -16, 9, -5, 9, 4);
                    bezierVertex(8, -6, 10, 10, 10, 20);
                endShape();
                break;
            case "Buoy":
                //...
                break;
            //...
            default: break;
        }
	popMatrix();
};
The display method for any instance of the Item class
Despite us having used very specific numbers to draw each component of the items, the transformations like translate and rotate within the pushMatrix() ... popMatrix() block allow us to generalize these commands to any position/orientation at which the item may be.
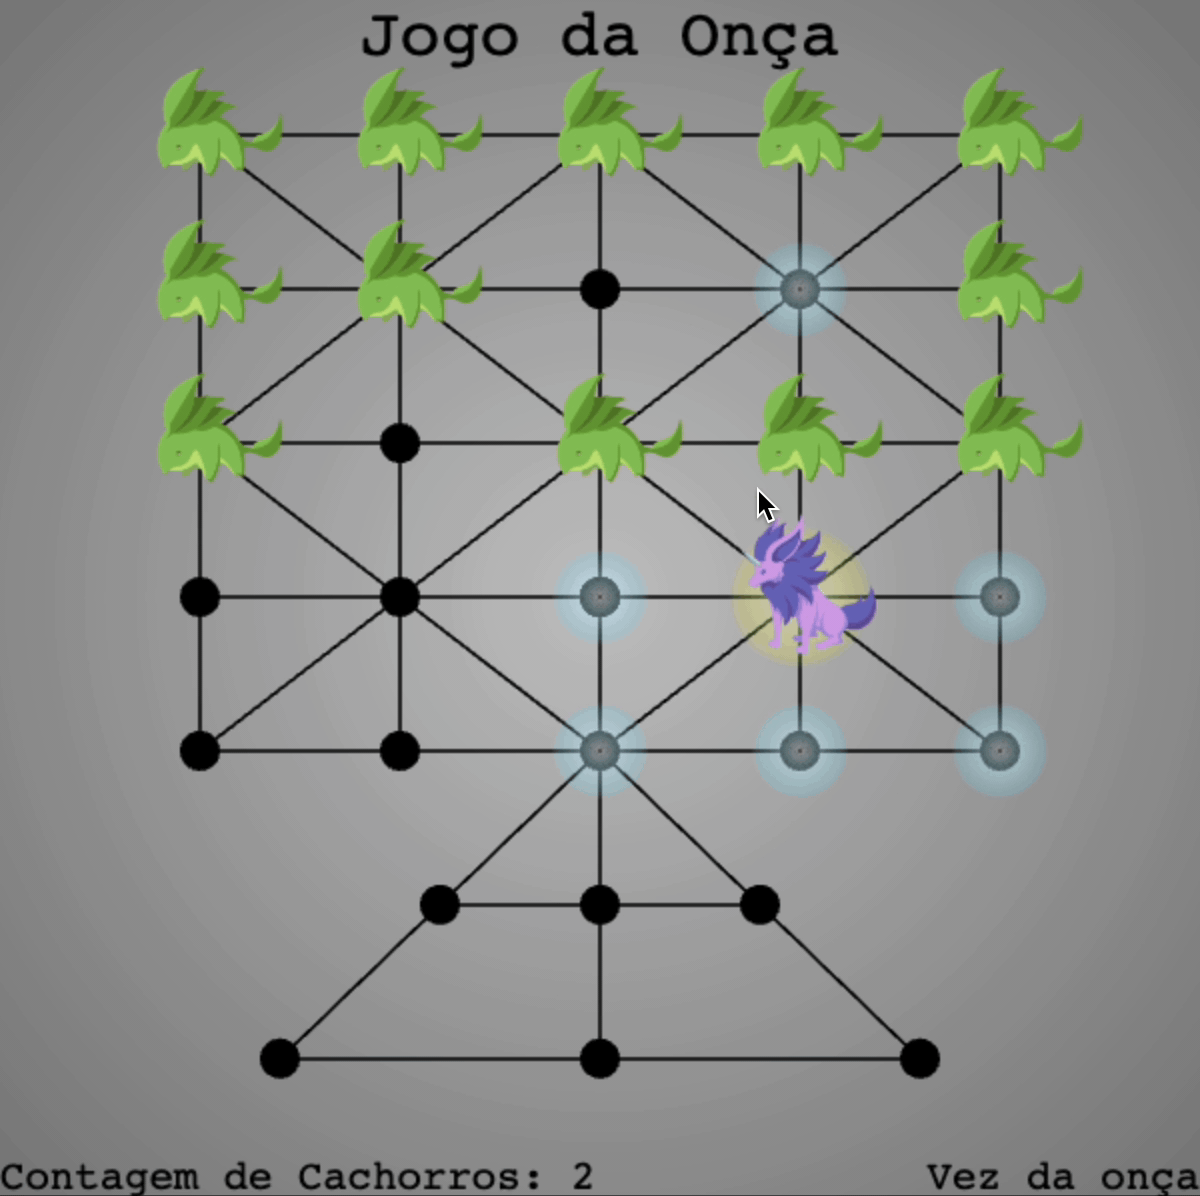
Jogo da Onça: Only do the Hard Work Once
I was in Brazil writing a paper about the Ethnomathematical study of indigenous Brazilian mathematics when I encountered a game called the Jogo da Onça: the Game of the Jaguar. Having found no online ways to play this game, I decided to code it up myself. The game works a bit like checkers:
- There are two teams: the cachorros (dogs) versus the onça (jaguar).
- The teams alternate in turns. Each player can move to any node to which their player is directly connected. The dogs may only move one dog per turn.
- The jaguar may hop over a dog in the same style as checkers in order to capture the dog.
- The jaguar hopes to capture 5 dogs in order to win. The dogs aim to trap the jaguar by giving it nowhere to move for its next turn.
Take a look at the GIF to get a sense of the gameplay:
To implement this game is inherently slightly complicated:
- The jaguar and dogs all have pre-defined initial positions.
- The triangular portion of the board complicates programming the positions of the vertices.
- We have to encode all of the connections between vertices.
- We have to write a method in order to express not just how a player can hop to an adjacent vertex, but also for the jaguar to be able to jump a cachorro. These jumps don't just follow from the connectivity: they must also be across three colinear vertices.
- We would like to highlight in blue the valid moves able to be taken by a player throughout the game, which requires the same types of routines as expressed earlier.
Most of these tasks require writing by-hand the valid coordinates or combinations of vertices involved. After having fixed an enumeration of the vertices, I resulted to storing all of the tedious connections in a few lists:
var GRID = {
    positions: [],
    cachorro_indices: [0, 1, 2, 5, 6, 7, 10, 11, 15, 16, 17, 20, 21, 22],
    jaguar_index: 12,
    connections: [[1, 5, 6], [0, 2, 6], [1, 3, 6, 7, 8], [2, 4, 8], [3, 8, 9], [0, 6, 10], [0, 1, 2, 5, 7, 10, 11, 12], [2, 6, 8, 12], [2, 3, 4, 7, 9, 12, 13, 14], [4, 8, 14], [5, 6, 11, 15, 16], [6, 10, 12, 16], [6, 7, 8, 11, 13, 16, 17, 18], [8, 12, 14, 18], [8, 9, 13, 18, 19, 25, 26, 27], [10, 16, 20], [10, 11, 12, 15, 17, 20, 21, 22], [12, 16, 18, 22], [12, 13, 14, 17, 19, 22, 23, 24], [14, 18, 24], [15, 16, 21], [16, 20, 22], [16, 17, 18, 21, 23], [18, 22, 24], [18, 19, 23], [14, 26, 28], [14, 25, 27, 29], [14, 26, 30], [25, 29], [28, 30], [27, 29]],
    jumping: [[0, 10], [5, 15], [10, 20], [1, 11], [6, 16], [11, 21], [2, 12], [7, 17], [12, 22], [3, 13], [8, 18], [13, 23], [4, 14], [9, 19], [14, 24], [0, 2], [1, 3], [2, 4], [5, 7], [6, 8], [7, 9], [10, 12], [11, 13], [12, 14], [15, 17], [16, 18], [17, 19], [20, 22], [21, 23], [22, 24], [0, 12], [6, 18], [12, 24], [4, 12], [8, 16], [12, 20], [2, 10], [10, 22], [28, 14], [25, 18], [14, 22], [2, 14], [8, 27], [14, 30], [25, 27], [28, 30], [13, 26], [14, 29]],
    jumped: [5, 10, 15, 6, 11, 16, 7, 12, 17, 8, 13, 18, 9, 14, 19, 1, 2, 3, 6, 7, 8, 11, 12, 13, 16, 17, 18, 21, 22, 23, 6, 12, 18, 8, 12, 16, 6, 16, 25, 14, 18, 8, 14, 27, 26, 29, 14, 26]
};
Specification of all board connections in the Jogo da Onça according to a particular enumeration of all vertices.
Notice how the connections list is filled with tuples of various lengths: the information stored here asks: "what are the indices of the vertices to which this vertex is connected?" For example, vertex 0 is connected to vertices 1, 5, and 6. The edge relation is reflexive, but I opted to write all of the connections for each vertex for simplicity in the code. The jumping list contains tuples of vertices from which it would be valid to jump from one to the next over a dog as the jaguar. The jumped list contains the corresponding "jumped" vertex. All of these pieces of information were necessary and sufficient to run the full dynamics of the game. Moreover, having these hand-written, I was able to write the rest of the code without any reference to specific indices or positions: the logic of the game could simply be my focus throughout the remainder of the program. For instance, the following method checks if a dog with index index_in_cachorros is allowed to move to an intended position intended_index:
// Check if dog at position index_in_cachorros may move to position at intended_index in the GRID.cachorro_indices list
var check_cachorro_valid_move = function(index_in_cachorros, intended_index) {
    var current_index = GRID.cachorro_indices[index_in_cachorros];
    if( // not another dog already occupying this space
        GRID.cachorro_indices.indexOf(intended_index) === -1
        // this vertex is connected to the dog's current position
        && GRID.connections[current_index].indexOf(intended_index) !== -1
		// the jaguar is not blocking this space
       	&& intended_index !== GRID.jaguar_index
      ) {
        // return that the move is valid
        return { final: intended_index };
    }
    // return that the move is invalid
    return undefined;
};
Method to check whether a dog may move to an intended vertex
Animations
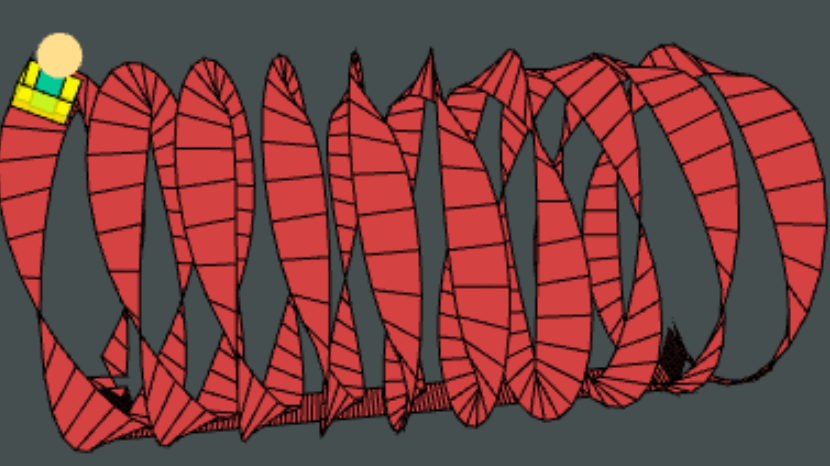
Adjustable Roller Coaster: 3D Graphics in Processing?!
One of my major successes during my heyday on Khan Academy was when I published my Adjustable Roller Coaster. It was probably the first 3D program to obtain many upvotes on the community page, accruing 2000+ votes and hundreds of "spin-offs." It's even featured in the Khan Academy curriculum for its use of custom-made buttons!
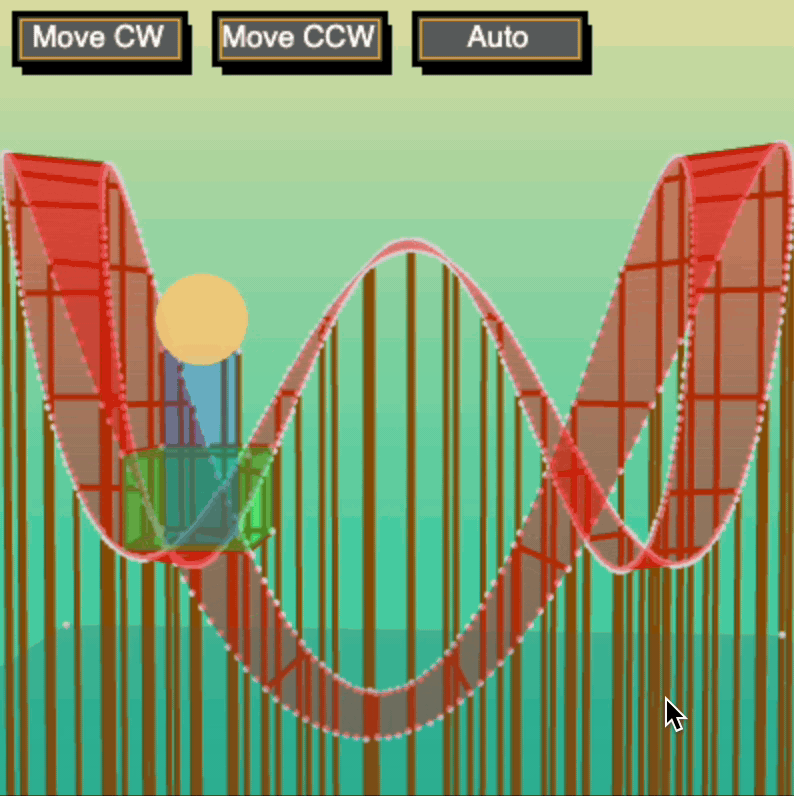
I learned the basics behind 3D graphics and transformations through Peter Collingridge's great tutorial on 3D Graphics with Processing.js. The original methods for rotation may not be available through his page any longer, but here I provide a sample of one of my methods inspired by his:
// Rotate a list `track` of vectors about the x-axis by an angle `theta`
// 	where each vector is of the form [x, y, z]
var rotateX3D = function(theta) {
    var sin_t = sin(theta);
    var cos_t = cos(theta);
    var node, y, z;
    for (var n = 0; n < track.length; n ++) {
        node = track[n];
        y = node[1];
        z = node[2];
        track[n][1] = y * cos_t - z * sin_t;
        track[n][2] = z * cos_t + y * sin_t;
    }
};
Method to rotate the whole track by a certain angle about the \(x\)-axis
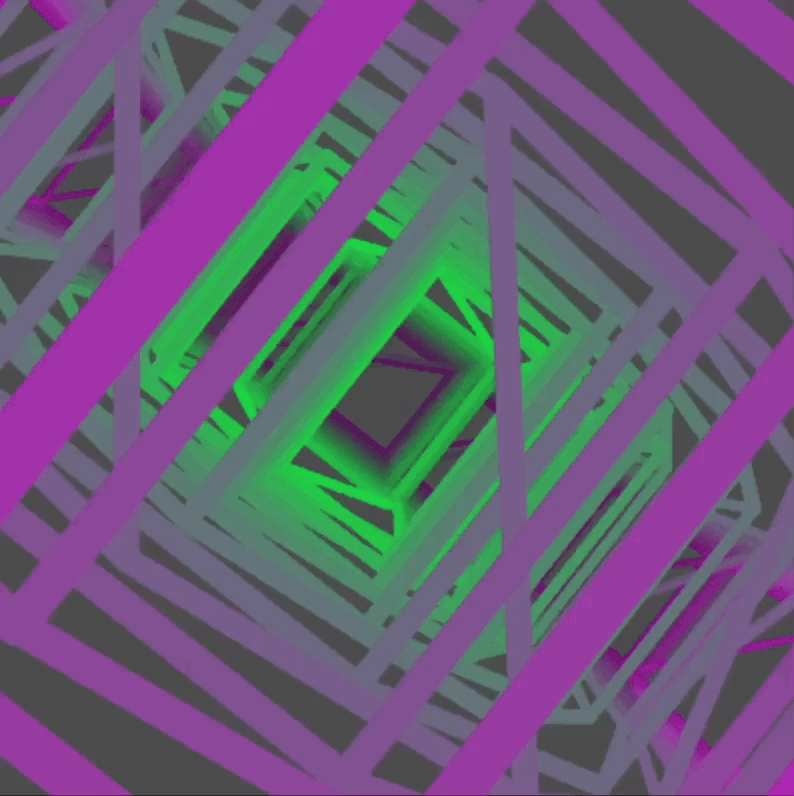
Light Vectors and Solid 3D Faces: True 3D Graphics
While producing a few 3D programs, I usually resorted to translucent faces because I hadn't figured out how to handle drawing based on depth. While producing the following 3D environment called Light Vectors and Solid 3D Faces, I actually got around this problem by only using convex shapes: no need to sort faces by depth, all we needed to do was determine which ones were facing forward. This program demonstrates 4 basic (convex) shapes that I was able to fully flesh out into subclasses of a generic Object3D class.

This program features inheritance: each type of object like Cuboid, Sphere, Pillow, and Tetrahedron inherit from the more general Object3D class specified below:
// Constructor
var Object3D = function(z) {
    // location
    this.position = z.position || new PVector();
    // size
    this.dimensions = z.dimensions || PVector.construct(function() { return width / 3; });

    this.points = []; this.edges = []; this.faces = [];

    // Presets
    this.rotate = z.q("rotate", true);
    this.paused = z.q("paused", false);
    this.faceColor = z.faceColor || color(255);
    this.edgeColor = z.edgeColor || color(100);
    this.pointColor = z.pointColor || color(255, 128, 0);
    this.displayPoints = z.q("displayPoints", true);
    this.displayEdges = z.q("displayEdges", true);
    this.displayFaces = z.q("displayFaces", true);
    this.flip = false;

    this.alpha = new PVector(); // angular acceleration
    this.omega = new PVector(); // angular velocity
    this.theta = new PVector(); // angular position

    this.rotateX = function(theta, center) {
        //...
    };
    this.rotateY = function(theta, center) {
        //...
    };
    this.rotateZ = function(theta, center) {
        //...
    };
};

// default hyperparameter to how perspective changes with depth
Object3D.perspectiveStandard = width;
// method to change size with depth
Object3D.perspectiveCoefficient = function(depth) {
    return (addPerspective)? this.perspectiveStandard / (Math.max(depth, 1 - this.perspectiveStandard) + this.perspectiveStandard) : 1;
};
// scale location by perspective coefficient
Object3D.getLocation = function(P) {
    return PVector.mult(P, this.perspectiveCoefficient(P.z));
};
// computes normal vector to a face P
Object3D.prototype.getNormalVectorToFace = function(P) {
    var vector = PVector.cross(PVector.sub(P[0], P[1]), PVector.sub(P[2], P[1]));
    if(P.length > 3 && vector.mag() === 0){
        vector = PVector.cross(PVector.sub(P[1], P[2]), PVector.sub(P[3], P[2]));
    }
    vector.capMag(1);
    return vector;
};
// update an object by setting random acceleration
Object3D.prototype.update = function(center) {
    if(this.rotate && !this.paused) {
        this.alpha = PVector.construct(function(){ return Math.random_0(); });
        // update angular motion
        this.alpha.capMag(0.1);
        this.omega.add(this.alpha);
        this.theta.add(this.omega); this.theta.capMag(1);
        // update angular position of all points in the object
        this.rotateX(this.theta.x, center);
        this.rotateY(this.theta.y, center);
        this.rotateZ(this.theta.z, center);
    }
};
// return color of a face P depending on angle to lightsource
Object3D.prototype.color = function(P) {
    // compute shadow constant
    var c = (PVector.dot(globalLightVector, this.getNormalVectorToFace(P)) / globalLightVector.mag() / this.getNormalVectorToFace(P).mag() + 1) / 2;
    // return corresponding shaded face color
    return lerpColor(color(0, 0, 0), this.faceColor, (this.flip ? 1 - c : c));
};
// display the object
Object3D.prototype.display = function() {
    var P = new Array(this.faces[0].length);
    // display points
    //...
    // display edges
    // ...
    // display faces
    // ...
};
Base class: Object3D main code
Inheritance looks like this in the case of the subclass Cuboid:
// Inheriting class constructor
var Cuboid = function(z) {
    // pass to the Object3D constructor
    Object3D.call(this, z);
    // Class specific instructions
    //...
};
// any Cuboid instance should act like an instance of Object3D
Cuboid.prototype = Object.create(Object3D.prototype);
Subclass Cuboid
Finally, instantiation of a Cuboid woud look like this:
var redCube = new Cuboid({
    position: new PVector(- width / 4, - height / 5, 0),
    dimensions: PVector.construct(function() { return width / 5; }),
    faceColor: color(255, 0, 0),
    displayPoints: false,
    displayEdges: false
});
Instance redCube of subclass Cuboid
The display of each object works in a straightforward way:
// display a 3D object
Object3D.prototype.display = function() {
	//...
    // display a face
    var face = this.faces[0];
    // adjust vertices of face to perspective
    var P = [];
    for(var i = 0; i < face.length; i ++){
        P[i] = Object3D.getLocation(this.points[face[i]]);
    }
    // only draw if facing forward
    if(PVector.dot(globalForwardVector, this.getNormalVectorToFace(P)) >= 0) {
        fill(this.color(P));
        beginShape();
        for(var i = 0; i < face.length; i ++) {
            vertex(P[i].x, P[i].y);
        }
        endShape(CLOSE);
    }
    //...
};
Displaying only the faces which face forward
This algorithm wouldn't work if our objects weren't convex! Moreover, this program won't do well trying to display multiple objects in the same line-of-sight.
Depth Sorter
Another attempt I made to display 3D objects, Depth Sorter. The general approach was to store all items in a global object called Frame and to have the ability to sort all objects.
The problem is that the code is quite inefficient and naïve: it assumes that sorting by depth can be done by calculating the average depth of all the vertices in an object and sorting by those average depths. I don't want to harp on this program too much, but I would like to highlight a few methods:
I made use of a more general set of rotation functions like so:
// Rotate a provided coordinate by an angle theta about a center
var rotateX3D = function(config){
    var coordinate = config.coordinate || origin;
    var theta = config.theta || 0;
    var center = config.center || origin;
    var sint = sin(theta);
    var cost = cos(theta);
    var y = coordinate.y;
    var z = coordinate.z;
    coordinate.y = (y - center.y) * cost - (z - center.z) * sint + center.y;
    coordinate.z = (z - center.z) * cost + (y - center.y) * sint + center.z;
    return coordinate;
};
Generic rotation about the \(x\)-axis
Unfortunately, this way of performing rotations is much less efficient because sin and cos are evaluated at theta for each point in the scene rather than all at once. It would have been better to run these on an object-basis rather than vertex-basis.
We also have an example in this program of interacting with keys:
// Whenever a key is pressed with code keyCode
var keyPressed = function(){
    if(!keys[keyCode]){
        sign = (R.angle.x >= 90 && R.angle.x < 270)? 1: -1;
    }
    keys[keyCode] = true;
};
// Whenever a key is released with code keyCode
var keyReleased = function(){
    keys[keyCode] = false;
};
// What to do if keys is true for the arrow buttons
var checkkeys = function(){
    //Movement if statements
    if(keys[UP]){ R.angle.y += sign * 5; }
    if(keys[DOWN]){ R.angle.y -= sign * 5; }
    if(keys[RIGHT]){ R.angle.x += 5; }
    if(keys[LEFT]){ R.angle.x -= 5; }
};
Interactive key commands handled like so
For Proccesing.js, this is a generally good approach: store the keys that are currently pressed or free, and make actions based on these booleans. This especially works when the event of pressing isn't what matters, but the fact that the key is currently pressed is what matters.
Roller Coaster 2.0: Mathematically-Sound Coaster
I created Roller Coaster 2.0 to be a more useful 3D graphics engine and to beat my previous Adjustable Roller Coaster program shown above. The mathematics and logic behind this program are a bit more advanced than those previous.
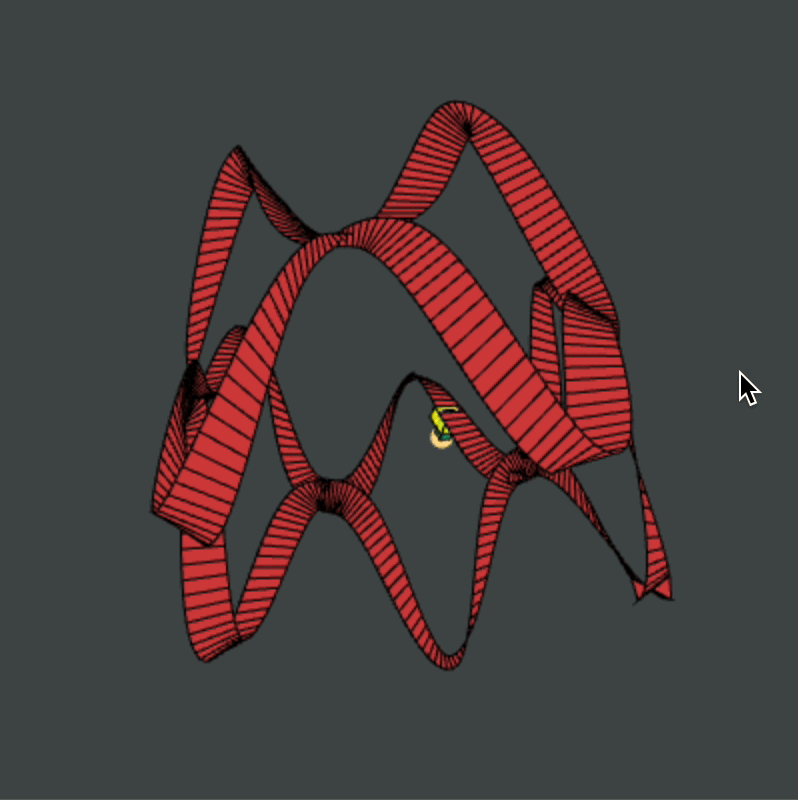
My general idea was simple:
- Building a roller coaster track should not be about defining every face and vertex explicitly. Instead, our three degrees of freedom are path, tilt, and size.
- A good roller coaster is a loop: so let us assume that the path of the coaster is described by a continuous function \(f: [0, 1] \to \R^3\) which satisfies \(f(0) = f(1)\).
- A good roller coaster not only loops but returns in the same orientation in which it started. So let us assume that the angular tilt of the track is a continuous functio \(\alpha: [0,1] \to \R\) such that \(\alpha(1) - \alpha(0) \equiv 0 \pmod{2 \pi}\).
- Finally, we may have that a piece of the track has a certain width which also behaves in a periodic way. So let's assume the size of the track is a continuous function \(R: [0,1] \to \R_{ > 0}\) such that \(R(0) = R(1)\).
With these three mathematical ingredients, it is easy to automatically generate a discretized version of the roller coaster track that they determine: simply define a class TrackElement to calculate the face of the track at a certain value of t:
// Faces drawn are based on TrackElement objects that are calculated using f, Alpha, and R
var TrackElement = function(config) {
    this.t = config.t || 0;
    this.pos = config.pos || new PVector(0, 0, 0);
    this.a = config.a || 0;
    this.R = config.R || 1;
};
// Returns a TrackElement with all of the built parts at time t given previous special vector old_w
TrackElement.get = function(t, old_w) {
    var e = new TrackElement({
        t: t, pos: f(t), a: Alpha(t), R: R(t)
    });
    e.build(old_w);
    return e;
};
// Given previous orientation vector old_w, calculates all of the necessary vector attributes
TrackElement.prototype.build = function(old_w) {
    // direction of motion
    this.d = PVector.normalize(PVector.sub(f(this.t), f(this.t - 0.001)));
    // mapping old orientation onto direction
    this.w = PVector.normalize(PVector.proj(old_w, this.d));
    // perpendicular to d and w
    this.pi = PVector.normalize(PVector.cross(this.d, this.w));
    var v = PVector.mult(PVector.add(PVector.mult(this.w, Math.cos(this.a)), PVector.mult(this.pi, Math.sin(this.a))), this.R);
    // "outside" of the track
    this.varphi = PVector.add(this.pos, v);
    // "inside" of the track
    this.phi = PVector.sub(this.pos, v);
    // how a person would be oriented riding
    this.perp = PVector.normalize(PVector.cross(this.d, v));
};
Defining TrackElement and its basic behavior
To display the scene, simply fill an array faces with Face objects created for each TrackElement as well as any other objects like for the cart and person riding the coaster, and sort the objects by depth:
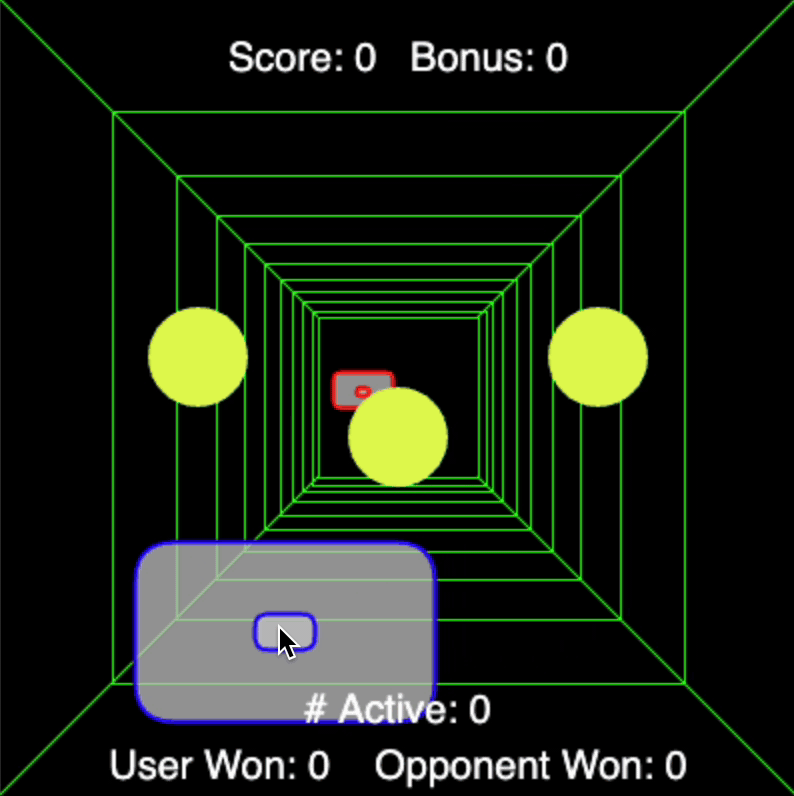
Processing.js Components
After creating a few programs which benefiting by offering user interactions with on-screen components like buttons and sliders, I decided that I (and other users of Processing.js) needed a better way to make use of UI components. The system of Processing.js Components that I developed worked very similarly to that of Java's JComponents, and included functionalities for drop-downs, text fields, sliders, buttons, check boxes, check box groups, popups, icons, hyperlinked text, and even speech bubble groups. Try interacting with the components below:
Creating Processing.js components for use in other programs that require user interaction. You can try interacting with the components here.
Each particular component is stored in a Pane object:
// Pane constructor
var Pane = function(config){
    // in which state of our program will this pane be displayed?
    this.gameState = config.gameState || gameState;
    // like an HTML z-index
    this.n = config.n || 0;
    // are the components in this pane immune to user interactions?
    this.disabled = config.disabled || false;
    this.components = [];
};

// These prototype methods also are defined
Pane.prototype.add_component,
Pane.prototype.draw,
Pane.prototype.update;
Defining a Pane container and its prototype methods
And each component class inherits from the parent class Component:
// Component constructor
var Component = function(config){
    // to which pane does this component belong
    this.pane = config.pane || 0;
    // type of component
    this.type = config.type || "";
    this.x = config.x || 0;
    this.y = config.y || 0;
    this.w = config.w || 50;
    this.h = config.h || 50;
    this.fill = config.fill || Theme.FILL;
    this.outline = config.outline || Theme.OUTLINE;
    this.inputtext = (config.inputtext || "").toString();
    this.n = panes[this.pane];
};

// These prototype methods are also defined
Component.prototype.setText,
Component.prototype.setFill,
Component.prototype.setPane,
Component.prototype.move,
Component.prototype.checkPane,
Component.prototype.mouse_on_RECT,
Component.prototype.mouse_on_ELLIPSE,
Component.prototype.analyze,
Component.prototype.return_value;
Defining a Component object and its prototype methods
Perhaps a good example of the logic that occurs at the component-level is best exemplified in the DropDown.prototype.update method:
// Update a DropDown instance
DropDown.prototype.update = function(){
    this.color_shift = 0;
    var on = false;
    // if mouse hovering over button
    if(this.mouse_on_RECT(this.x + (this.w - this.h)/2, this.y, this.h, this.h)){
        // enter hover mode
        this.hover();
        // if mouse depressed
        if(mouseIsPressed){
            on = true;
            // if mouse newly pressed
            if(!mouse){ this.beginning = true; }}
    }
    // if displaying dropdown options
    if(this.open){
        // loop over displayed options
        DROP_HOVER:
        for(var i = 0; i < this.options.length; i ++){
            // if mouse hovering over an option
            if(this.mouse_on_RECT(this.x + this.offset, this.y + (i+1)*this.h, this.rw, this.h)){
                this.hover_index = i;
                setCursor(HAND);
                if(mouseIsPressed){ on = true; this.press(i); }
            }
        }
    }
    // react to click on dropdown button
    if(this.beginning){ this.press(); }
    if(mouseIsPressed && !on){ this.open = false; }
    // reset if no mouse pressing
    if(!mouseIsPressed){
        this.mouse = false;
        this.beginning = false;
	}
    // update display value
    this.update_value();
    // reset button fill color
    this.button_fill = this.setFill(this.original_button_fill);
};
Updating a Dropdown component
Each of the methods called throughout the routine runs some other logic or display instructions. Each component can be pretty complex to map out but works by a similar logic.
The draw loop in this program handles the order of operations:
var draw = function() {
    // track mouse position/speed
    mouse_movement();
    // reset the cursor to arrow pointer
    setCursor(ARROW);
    // draws background and checks state of program
    check_gameState();
    // draws all panes and hence their components
    draw_components();
    // update to cursor
    if(pcursorState !== cursorState){
        updateCursor();
        pcursorState = cursorState;
    }
    // prevents turning on a component before having clicked
    if(mouseIsPressed){ mouse = true; }
    else{ mouse = false; }
};
The draw loop in the Processing.js Components program
The core code in this program can be used in many situations, and certainly can help a new programmer to have a logical UI ready for their specific purpose. I made use of these components many times in subsequent programs myself.
Language and Intelligence:
The purpose of my program Language and Intelligence was to demonstrate the entropy of languages. I was initially inspired by Brit Cruise's A Mathematical Theory of Communication, where he explains how Shannon entropy could be used to analyze the randomness of human language. I built a program which could perform high-order approximations to any language using some amount of example text from that language.
For example, in the following (nonsensical) text in English:
we may count all instances of each letter, all instances of pairs of letters, triples, etc. You may notice that there are three instances of the pair is, two instances of the, and zero instances of zsj. What is the use in doing this counting?
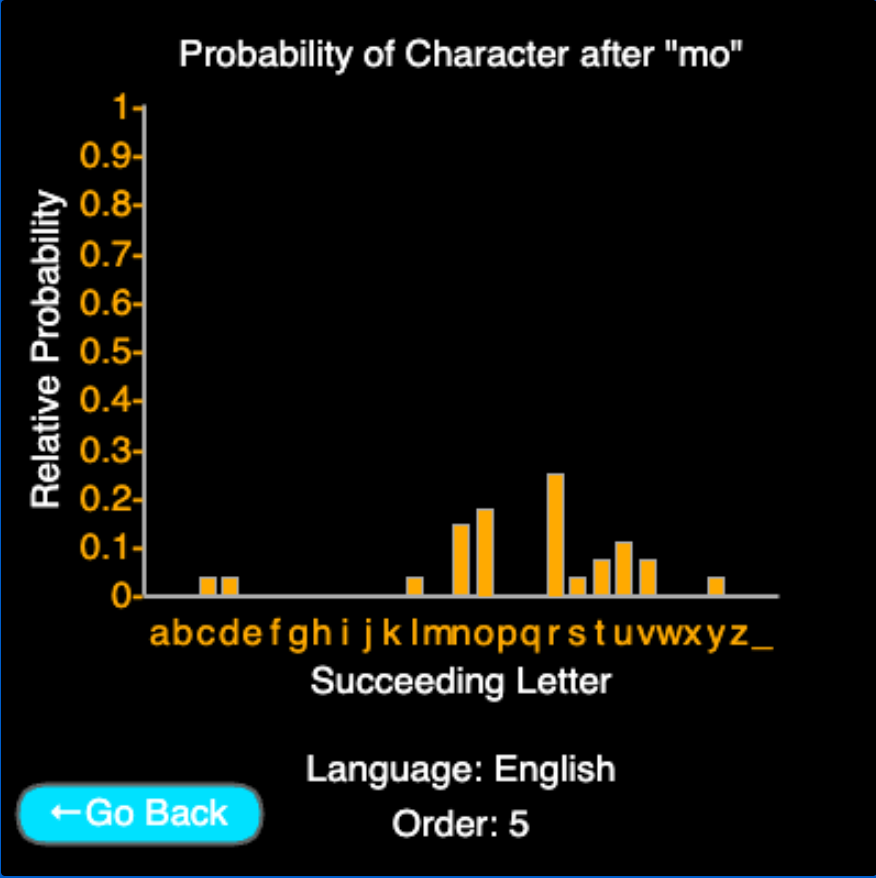
Above is a screenshot of a typical use case of my program: it expresses that, out of the whole sample text that it received, the probabilities of finding each one-letter continuation of the string mo You'll notice that, reasonably, mor, moo, and mon are the most likely continuations, while moj, mox, moq did not even register. Besides being a fun way to explore the normal patterns of the English language, there is a deeper amount of information we may glean from the observed frequencies.
Shannon Entropy is an information-theoretic quantity used to quantify the degree of randomness or disorder across a probability distribution. If we consider the probability distribution of all \(n\)-tuples of English letters appearing in their natural frequency in written English, we may approximate the Shannon Entropy of the whole language. Simply fix an \(n \geq 1\), compute the probabilities of each \(n\)-tuple of letters using some sample text, and plug in the probabilities into Shannon's equation
\[H(\text{English}) \approx - \sum_{w \text{---}n\text{-tuple}} \left(\operatorname{Prob}(w) \cdot \log_2 (\operatorname{Prob}(w))\right).\]
This program is able to do this for any \(n\), as well as a bit more: it can perform the analysis, display an interactive conditional probability chart for any starting sequence on what's the most likely way to continue the sequence by one character, generate random messages of text following the same probability distribution but possibly including fake yet realistic words of that language, as well as attempt to autocomplete someone typing in that language without cross-checking with a dictionary.
For instance, when performing an \(n = 5\)-tuple approximation to English, my program generates the random message:
Some of these outputs are real English, others convincingly English-like, and others nonsensical. This shows the power of harnessing patterns even without having access any rules about the language. I must say that this program was made well before large language models, and well before I was conscious of any AI models, so this was my baby step into thinking about generative models.
I'm very proud of this program, and especially glad that Processing.js could make it so widely available on Khan Academy's Computer Science community.
Miscellaneous Animations
Here I've collected some extra animations that I wanted to at least show without going into much detail abou thow I did them. I'll let you think about it. You can always click on the links to the see the code and decipher my process, or try for yourself.
Aurora Borealis
I submitted this Aurora program as part of a presentation in my AP Environmental Science class in high school.
Abelian Sandpile
An Abelian Sandpile is a grid of values that resembles a sand pile in its dynamics: cells can only hold so much sand, passing on excess to their neighbors. The exact dynamics can be found here.
Recursive Art
I made Recursive Art Project this to demonstrate some art with recursion. There are more animations in the original program.
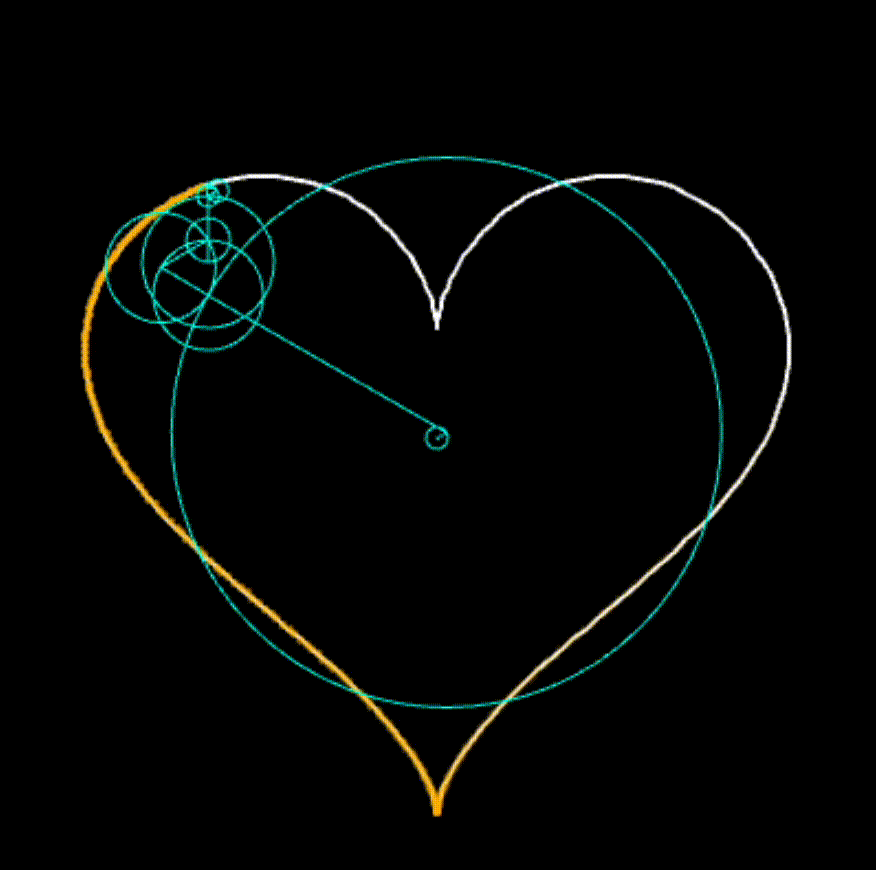
Fourier Circle Approximations
Fourier Circles can be used to approximate any curve in the plane. I tried my hand at coding the required algorithm to make it approximate a few shapes like a Heart!
Algorithms
Regression with Genetic Algorithms
I was able to approach a standard math problem of polynomial regression via Genetic Algorithms. The program cycles through multiple generations of polynomials which attempt to approximate a standard polynomial whose outputs we can access but whose exact generating formula we cannot. New generations represent lightly-mutated offspring of the fittest individuals from the previous generation. Fitness is measured by minimizing the measure of difference between the individual and the reference polynomial.
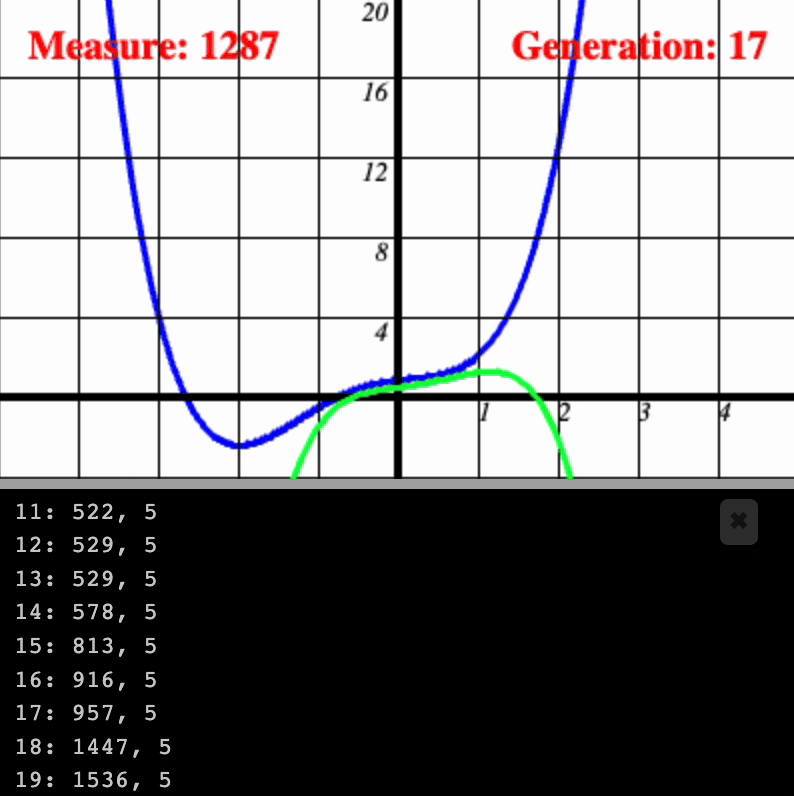
The key method to this is how the Organism class reproduces from two previous instances of the Organism class. There will be use of some hyper-parameters.
// Reproduce two given Organisms into new Organism
Organism.reproduce = function(A, B) {
    // list of coefficients for x^i
    var a = {};
    // maxPower computed by by A and B
    var maxPower = Math.max(A.maxPower, B.maxPower);
    // who passes on their coefficient genes
    var winner = (random() < 0.5) ? A : B;
    // build new coefficient genes for child
    for(var i = 0; i < maxPower; i ++) {
        a[i] = (Math.random() <= PROBABILITY_OF_MUTATION_COEFFICIENT) ?
				winner.a[i] :
				map(Math.random(), 0, 1, COEFFICIENT_RANGE[0], COEFFICIENT_RANGE[1]);
    }
    // keep adding coefficients for higher powers with low probability
    while(Math.random() <= PROBABILITY_OF_MUTATION_NEXTPOWER) {
        a[maxPower++] = map(Math.random(), 0, 1, COEFFICIENT_RANGE[0], COEFFICIENT_RANGE[1]);
    }
    // produce child Organism
    return new Organism({
        generation: winner.generation + 1,
        color: color(hue(winner.color + 0.10 * (Math.random() * 2 - 1) * (255)), saturation(winner.color), brightness(winner.color)),
        a: a,
        maxPower: maxPower,
        parent: [A, B]
    });
};
How to reproduce an Organism from two parent Organisms
This actually works pretty well, and there are plenty more opportunities to explore genetic algorithms more useful than this.
Extending the Numeric System
I had the idea to push the numeric system of the language past its limits. This program: Extending the Positive Integers, aimed to provide the ability to perform mathematical operations on numbers much bigger than the typical constraints of Processing.js.
In Processing, int represents the datatype for integers. Integers can be as large as \(2^{31} - 1 = 2,147,483,647\) and as low as \(-2^{31} = -2,147,483,648\). They are stored as 32 bits of information. With the GIF as my witness, my program is able to compute with numbers larger than \(2^{80} = 1,208,925,819,614,629,174,706,176\), over 100 trillion times larger. What explains this difference in capabilities?

Rather than being stored as the primitive data types int, these numbers are stored as string data containing binary representations in order to perform many basic calculations. I wrote original algorithms for how to perform computations on binary representations stored as strings and then convert back into decimal. We store the data in an INT object as follows:
// INT object constructor
var INT = function(integer, base, conversion) {
    if(base === 2) {
        // remove leading zeros
        this.B2 = INT.simplifyString(str(integer));
        // bother performing conversion to base 10?
        if(conversion || conversion === undefined) {
            this.to10();
        } else { this.B10 = "0"; }
    } else {
        this.B10 = INT.simplifyString(str(integer));
        if(conversion || conversion === undefined) {
            this.to2();
        } else { this.B2 = "0"; }
    }
};
Constructor for INT class
The program assumes non-negative integers. Addition works according to the two methods:
// add any number of INT instances
INT.ADD = function() {
    if(arguments.length === 0) { return undefined; }
    var SUM = arguments[0].copy();
    // sum the binary forms
    for(var i = 1; i < arguments.length; i ++) {
        SUM.set(INT.addBinaryString(SUM.B2, arguments[i].B2), 2, false);
    }
    // compute its decimal form
    SUM.update(10);
    return SUM;
};
// add some number of INTs' binary forms
INT.addBinaryString = function() {
    // unpack argument[0] if array
    var args = (Array.isArray(arguments[0])) ? arguments[0] : arguments;
    switch(args.length) {
        case 0: return 0;
        case 1: return args[0].copy();
        case 2:
            var SUM = "", sum, next = 0,
				length = Math.max(INT.simplifyString(args[0]).length, INT.simplifyString(args[1]).length);
            // for all bits in summands
            for( var i = 0; i <= length; i ++ ) {
                // sum bits, possibly carry 1 from previous bits
                sum = parseInt(next, 2) +
                      INT.getDigit(INT.simplifyString(args[0]), i, 2) +
                      INT.getDigit(INT.simplifyString(args[1]), i, 2) ;
                next = 0;
                if(sum > 1) { sum %= 2; next ++; }
                SUM = str(sum) + SUM;
            }
            return INT.simplifyString(SUM);
        // when more than two summands
        default:
            var SUM = INT.simplifyString(args[0]);
            for( var i = 1; i < args.length; i ++ ) {
                SUM = INT.addBinaryString(SUM, INT.simplifyString(args[i]));
            }
            return INT.simplifyString(SUM);
    }
};
Two addition methods in the INT class
There are many other methods worked out in this program, like for subtraction, multiplication, division, exponentiation, tetration, modular arithmetic, comparison, etc. The hardest was to interpret a written mathematical expression from the user into an executable sequence of instructions. All of that is summarized in INT.interpret:
// evaluate expression E as mathematical set of instructions
INT.interpret = function(E) {
    // preparation for interpretation for whitespace
    E = E.replace(/ /g,''); E = E.replace(/\n/g, '');
    if(E.length === 0) { return ""; }
    // ignore leading operations
    if("^*/+-%(".contains(E.charAt(E.length - 1))) {
        return INT.interpret(E.substring(0, E.length - 1));
    }
    // ignore any expression outside our alphabet
    for(var i = 0; i < E.length; i ++) {
        if(!"^+-*/0123456789()% \n".contains(E.charAt(i))) {
            return "";
        }
    }
    // recursion on parenthesis
    var invar, i0, i;
    while(E.indexOf("(") > -1) {
        invar = 1; i0 = E.indexOf("("); i = i0 + 1;
        while(invar !== 0 && i++ < E.length) {
            switch(E.charAt(i)) {
                case "(": invar ++; break;
                case ")": invar --; break; default:
            }
        }
        if(invar !== 0) { return ""; }
        E = E.substring(0, i0) + this.interpret(E.substring(i0 + 1, i)) + E.substring(i + 1);
    }
    // generate INTs found in expression
    var numbers = [];
    var answer = "", startNum, endNum;
    ESTABLISH_INTS:
    for(var i = 0; i < E.length; i ++) {
        // continue building the number
        if("0123456789".contains(E.charAt(i))) {
            if(startNum === undefined) {
                startNum = i; endNum = i;
            } else { endNum ++; }
            if(i === E.length - 1) {
                numbers.push(new INT("" + E.substring(startNum), base));
                E = E.substring(0, startNum);
            }
        } else {
            numbers.push(new INT(E.substring(startNum, endNum + 1), base));
            E = E.substring(0, startNum) + E.substring(endNum + 1); i -= 1 + endNum - startNum;
            startNum = undefined;
        }
    }

    // prioritize exponentiation first
    EX:
    for(var i = 0; i < E.length; i ++) {
        switch(E.charAt(i)) {
            case '^':
                numbers[i] = INT.POW(numbers[i], numbers[i + 1]);
                numbers.splice(i + 1, 1);
                E = E.substring(0, i) + E.substring(i + 1);
                i --;
                break;
        }
    }

    // multiplication, division, and modular division all at same priority level
    MMD:
    for(var i = 0; i < E.length; i ++) {
        SWITCH:
        switch(E.charAt(i)) {
            case '*':
                numbers[i] = INT.MULT(numbers[i], numbers[i + 1]);
                numbers.splice(i + 1, 1);
                E = E.substring(0, i) + E.substring(i + 1);
                i --;
                break SWITCH;
            case '/':
                numbers[i] = INT.DIV(numbers[i], numbers[i + 1]);
                numbers.splice(i + 1, 1);
                E = E.substring(0, i) + E.substring(i + 1);
                i --;
                break SWITCH;
            case '%':
                numbers[i] = INT.MOD(numbers[i], numbers[i + 1]);
                numbers.splice(i + 1, 1);
                E = E.substring(0, i) + E.substring(i + 1);
                i --;
                break SWITCH;
        }
    }

    // addition and subtraction share the lowest priority
    AS:
    for(var i = 0; i < E.length; i ++) {
        switch(E.charAt(i)) {
            case '+':
                numbers[i] = INT.ADD(numbers[i], numbers[i + 1]);
                numbers.splice(i + 1, 1);
                E = E.substring(0, i) + E.substring(i + 1);
                i --;
                break;
            case '-':
                numbers[i] = INT.SUB(numbers[i], numbers[i + 1]);
                numbers.splice(i + 1, 1);
                E = E.substring(0, i) + E.substring(i + 1);
                i --;
        }
    }
    return (base === 2)? numbers[0].B2 : numbers[0].B10;
};
How to evaluate an expression provided by the user
The idea behind this program was simple, it was just a complicated set of methods to implement to perform all of the conversions and operations that I needed from a useful calculator.
Appendix
There were many helper functions I made use of throughout my programs. Some of them had to do with the PVector class, which can store vectors in the form of objects with .x, .y, and .z properties storing information in the \(x\), \(y\), and \(z\) coordinates, respectively:
// cap the magnitude of this PVector to `cap`
PVector.prototype.capMag = function(cap) {
    this.mult(Math.min(cap, this.mag()) / this.mag());
};
// @static; perform the dot product between two 3D PVectors
PVector.dot = function(u, v) {
    return u.x * v.x + u.y * v.y + u.z * v.z;
};
// @static; perform the cross product between two 3D PVectors
PVector.cross = function(u, v) {
    return new PVector(u.y * v.z - u.z * v.y, u.z * v.x - u.x * v.z, u.x * v.y - u.y * v.x);
};
// @static; transform a PVector by a scale and translation
PVector.transform = function(vector, scalar, translator) {
    return PVector.add(translator, PVector.mult(vector, scalar));
};
// @static; fill in a 3D PVector with the outputs of some function `f`
PVector.construct = function(f) {
    return new PVector( f(), f(), f() );
};
// @static; Interpolate between two PVectors assuming t between 0 and 1
PVector.map = function(t, A, B) {
    return new PVector( map(t, 0, 1, A.x, B.x), map(t, 0, 1, A.y, B.y), map(t, 0, 1, A.z, B.z) );
};
// @static; Project PVector v onto plane given by normal PVector n
PVector.proj = function(v, n) {
    return PVector.sub( v, PVector.mult(n, PVector.dot(v, n)) );
};
Various custom PVector methods I've used
Others had to do with the generic Object class from which all objects implicitly inherit:
// set a default value for a property if not already set
Object.prototype.q = function(property, defaultVal) {
    return (this[property] === undefined) ? defaultVal : this[property];
};
// recursively copy an object
Object.prototype.copy = function() {
    var obj = {};
    // if array
    if(Array.isArray(this)) {
        obj.length = this.length;
    }
    // for all keys
    for(var k in this) {
        obj[k] =
            // recursive call or pass by value
			(typeof(this[k]) === 'object') ?
			this[k].copy() : this[k];
    }
    return obj;
};
Various custom Object methods I've used
Others had to do with the Array class, in which every instance has a length property:
// @static; remove the element at given index
Array.remove = function(array, index) {
    array.splice(index, 1);
    return array;
};
// find first instance of e in array
Array.prototype.find = function(e) {
    for(var i = 0; i < this.length; i ++) {
        if(this[i] === e) { return i; }
    }   return -1;
};
// @static; remove the first instance of element e from array
Array.removeElement = function(array, e) {
    return Array.remove(array, array.find(e));
};
// return string assuming is 2D array
Array.prototype.toString2 = function() {
    var string = "[";
    for(var i = 0; i < this.length; i ++) {
        string += "[";
        for(var j = 0; j < this[i].length; j ++) {
            string += this[i][j] + ",";
        }
        string = string.substring(0, string.length - 1) + "],";
    }
    return string.substring(0, string.length - 1) + "]";
};
// find [i][j] index pair for element e in 2D array
Array.prototype.find2D = function(e) {
    for(var i = 0; i < this.length; i ++) {
        for(var j = 0; j < this.length; j ++) {
            if(this[i][j] === e) { return [i, j]; }
        }
    }
    return [-1, -1];
};
// @static; given equality method `equals` between Objects e, find object e
Array.prototype.findObj = function(e) {
    for(var i = 0; i < this.length; i ++) {
        if(equals(this[i], e)) { return i; }
    }   return -1;
};
// @static; remove duplicates from 1D array of Objects assuming given equality method `equals` between such Objects
Array.removeDuplicates = function(array) {
    var tempArray = [], temp;
    OUTER:
    for(var i = 0; i < array.length; i ++) {
        temp = array[i];
        for(var j = 0; j < tempArray.length; j ++) {
            if(equals(tempArray[j], temp)) {
                continue OUTER;
            }
        }
        tempArray.push(temp);
    }
    return tempArray;
};
// copy 1D array assuming not storing arrays/objects to be passed by value
Array.prototype.shallowCopy = function() {
    var temp = [];
    for(var i = 0; i < this.length; i ++) {
        temp[i] = this[i];
    }
    return temp;
};
Various custom Array methods I've used
Conclusion
I hope you can glean from this large summary of my work using Processing.js on Khan Academy that Projecessing.js is a fantastic option for beginner/intermediate programmers to learn visual and CS skills that appear in more advanced programming languages and programming tasks.
Please let me know if you have any questions! You can always find my programs here complete with the source codes and outputs.